언리얼에서 AI의 이동범위를 동적으로 지정하는 방법
NavMeshBoundsVolume이란?
NavMeshBoundsVolume은 AI가 이동할 수 있는 영역을 정의하는 장치입니다.
Unreal Engine에서 AI가 맵 위를 자유롭게 돌아다니기 위해서는, 이동 가능한 경로 정보가 필요합니다. 이때 사용하는 것이 네비게이션 메시(NavMesh) 시스템이며, NavMeshBoundsVolume은 이 네비게이션 메시가 생성될 범위를 지정하는 역할을 합니다.
place actors 메뉴에서 volumes을 찾아 nav mesh bounds volume 을 찾아줍니다.
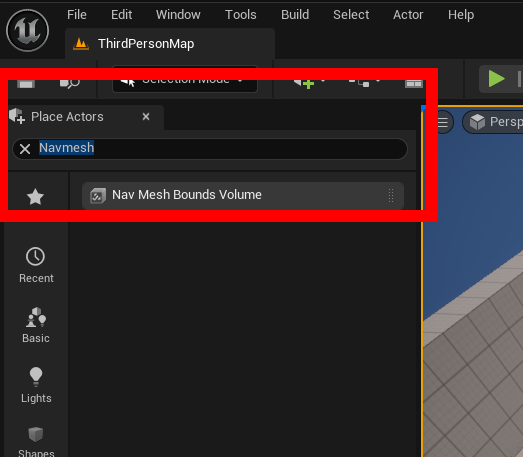
드래그앤드롭으로 레벨 내 배치합니다.
처음엔 그저 주황색 상자로 뜨기때문에 보기 어려울 수 있지만 p를 누르면 녹색 지형으로 나타납니다.
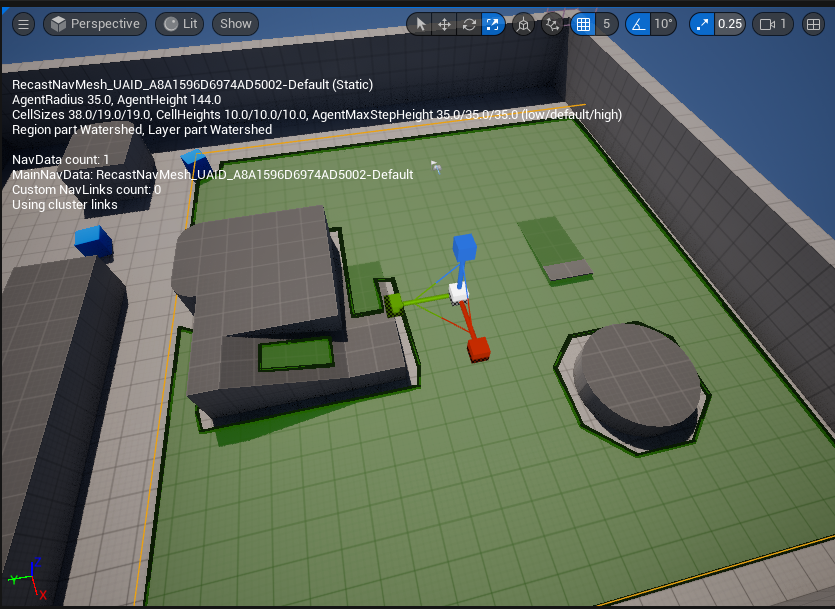
이렇게 static 즉 동적으로 움직이지 않을 예정이라면 이대로 사용하셔도 좋습니다.
하지만 게임도중 ai가 특정 조건에 도달하면 움직일 수 있는 범위가 늘거나 줄거나 하는 경우가 있을 것입니다.
그렇기에 해당 영역을 동적으로 바꿔줄 세팅이 필요합니다.
첫번째로 프로젝트 세팅을 바꿔줘야합니다.Engine > Navigation Mesh 으로 들어가
Runtime 섹션의 Runtime Generation 옵션을 Dynamic으로 변경(Static이 default)합니다.
그외에 옵션도 있지만 자세한 내용은 https://dev.epicgames.com/documentation/ko-kr/unreal-engine/overview-of-how-to-modify-the-navigation-mesh-in-unreal-engine 를 참조
이제 움직이는 메쉬 아무거나 넣어서 인게임에서 영역 밖과 안을 비교해서 확인해보시면 동적으로 바뀐다는걸 확인 할 수 있습니다.

큐브 위에 새롭게 영역이 생겼음을 확인할 수 있습니다. 이전 static일땐 생기지 않았습니다.
그럼 다른 옵션이었던 Dynamic Modifier같은 경우는 어떻게 될까요?

다음과 같이 새로운 영역보다는 해당 영역을 빼는것만 가능합니다.
이때 NavMeshBoundsVolume은 크기를 조절할 때 일반적인 Scale(스케일) 값을 사용하는 게 아니라, Brush라는 특별한 방식으로 크기를 정의합니다.
문제는 언리얼 엔진의 구조상 이 Brush는 게임이 실행되고 있는 도중에는 새로 만들거나 변경할 수 없다는 점입니다.
즉, 게임을 플레이하는 중간에 NavMeshBoundsVolume을 동적으로 생성하거나, 크기를 바꿔서 AI가 갈 수 있는 범위를 늘리거나 줄이는 건 어렵다는 뜻입니다.
설계 단계에서는 자유롭게 조정 가능하지만, 런타임 중에는 제한적이라는 걸 기억하면 됩니다.
그렇다면 AI가 맵전체에 있는 경우 네비메시를 레벨 전체에 적용하면 엄청나게 무거워지고 플레이어가 안보고있어도 AI를 열심히 일해야합니다. 그런 비효율적인 방식만이 정답일까요
당연히 언리얼은 이를 인지하여 Navigation Invoker이라는 시스템을 제공합니다.
Navigation Invoker은 Navigation Invoker라는 컴포넌트를 가진 액터의 주변 영역만 연산하여 리소스를 아끼는 기능입니다.
이를 사용해보기 위해 캐릭터 소스코드를 열어주어 수정해보겠습니다
#pragma once
#include "CoreMinimal.h"
#include "GameFramework/Character.h"
#include "Logging/LogMacros.h"
#include "NavigationInvokerComponent.h"//내용
#include "SCC_UEAICharacter.generated.h"

class USpringArmComponent;
class UCameraComponent;
class UInputMappingContext;
class UInputAction;
struct FInputActionValue;

DECLARE_LOG_CATEGORY_EXTERN(LogTemplateCharacter, Log, All);

UCLASS(config = Game)
class ASCC_UEAICharacter : public ACharacter
{
	GENERATED_BODY()

	/** Camera boom positioning the camera behind the character */
	UPROPERTY(VisibleAnywhere, BlueprintReadOnly, Category = Camera, meta = (AllowPrivateAccess = "true"))
	USpringArmComponent* CameraBoom;

	/** Follow camera */
	UPROPERTY(VisibleAnywhere, BlueprintReadOnly, Category = Camera, meta = (AllowPrivateAccess = "true"))
	UCameraComponent* FollowCamera;

	/** Navigation Invoker component 추가내용*/
	UPROPERTY(BlueprintReadWrite, Category = Navigation, meta = (AllowPrivateAccess = "true"))
	UNavigationInvokerComponent* NavInvoker;

	/** MappingContext */
	UPROPERTY(EditAnywhere, BlueprintReadOnly, Category = Input, meta = (AllowPrivateAccess = "true"))
	UInputMappingContext* DefaultMappingContext;

	/** Jump Input Action */
	UPROPERTY(EditAnywhere, BlueprintReadOnly, Category = Input, meta = (AllowPrivateAccess = "true"))
	UInputAction* JumpAction;

	/** Move Input Action */
	UPROPERTY(EditAnywhere, BlueprintReadOnly, Category = Input, meta = (AllowPrivateAccess = "true"))
	UInputAction* MoveAction;

	/** Look Input Action */
	UPROPERTY(EditAnywhere, BlueprintReadOnly, Category = Input, meta = (AllowPrivateAccess = "true"))
	UInputAction* LookAction;

public:
	ASCC_UEAICharacter();

	/** 네비게이션 메시 생성 반경 추가내용 */
	float NavGenerationRadius;

	/** 네비게이션 메시 제거 반경 추가내용 */
	float NavRemovalRadius;


protected:
	/** Called for movement input */
	void Move(const FInputActionValue& Value);

	/** Called for looking input */
	void Look(const FInputActionValue& Value);

protected:
	virtual void NotifyControllerChanged() override;
	virtual void SetupPlayerInputComponent(class UInputComponent* PlayerInputComponent) override;

public:
	/** Returns CameraBoom subobject **/
	FORCEINLINE class USpringArmComponent* GetCameraBoom() const { return CameraBoom; }
	/** Returns FollowCamera subobject **/
	FORCEINLINE class UCameraComponent* GetFollowCamera() const { return FollowCamera; }
	/** Returns NavInvoker subobject  추가내용**/
	FORCEINLINE class UNavigationInvokerComponent* GetNavInvoker() const { return NavInvoker; }
};
기존 캐릭터 헤더파일에서 추가가 된 내용은 주석 끝에 추가내용이라고 써져있습니다.
캐릭터 컴포넌트에 Invoker을 추가해준 내용입니다.
이에 맞는 cpp 파일입니다.
#include "SCC_UEAICharacter.h"
#include "Engine/LocalPlayer.h"
#include "Camera/CameraComponent.h"
#include "Components/CapsuleComponent.h"
#include "GameFramework/CharacterMovementComponent.h"
#include "GameFramework/SpringArmComponent.h"
#include "GameFramework/Controller.h"
#include "EnhancedInputComponent.h"
#include "EnhancedInputSubsystems.h"
#include "InputActionValue.h"

DEFINE_LOG_CATEGORY(LogTemplateCharacter);

//////////////////////////////////////////////////////////////////////////
// ASCC_UEAICharacter

ASCC_UEAICharacter::ASCC_UEAICharacter()
{
	// Set size for collision capsule
	GetCapsuleComponent()->InitCapsuleSize(42.f, 96.0f);

	// Don't rotate when the controller rotates. Let that just affect the camera.
	bUseControllerRotationPitch = false;
	bUseControllerRotationYaw = false;
	bUseControllerRotationRoll = false;

	// Configure character movement
	GetCharacterMovement()->bOrientRotationToMovement = true; // Character moves in the direction of input...
	GetCharacterMovement()->RotationRate = FRotator(0.0f, 500.0f, 0.0f); // ...at this rotation rate

	// Note: For faster iteration times these variables, and many more, can be tweaked in the Character Blueprint
	// instead of recompiling to adjust them
	GetCharacterMovement()->JumpZVelocity = 700.f;
	GetCharacterMovement()->AirControl = 0.35f;
	GetCharacterMovement()->MaxWalkSpeed = 500.f;
	GetCharacterMovement()->MinAnalogWalkSpeed = 20.f;
	GetCharacterMovement()->BrakingDecelerationWalking = 2000.f;
	GetCharacterMovement()->BrakingDecelerationFalling = 1500.0f;

	// Create a camera boom (pulls in towards the player if there is a collision)
	CameraBoom = CreateDefaultSubobject<USpringArmComponent>(TEXT("CameraBoom"));
	CameraBoom->SetupAttachment(RootComponent);
	CameraBoom->TargetArmLength = 400.0f; // The camera follows at this distance behind the character
	CameraBoom->bUsePawnControlRotation = true; // Rotate the arm based on the controller

	// Create a follow camera
	FollowCamera = CreateDefaultSubobject<UCameraComponent>(TEXT("FollowCamera"));
	FollowCamera->SetupAttachment(CameraBoom, USpringArmComponent::SocketName); // Attach the camera to the end of the boom and let the boom adjust to match the controller orientation
	FollowCamera->bUsePawnControlRotation = false; // Camera does not rotate relative to arm


	// 변수를 사용하여 생성 반경과 제거 반경 설정 추가내용
	NavGenerationRadius = 10.0f;
	NavRemovalRadius = 15.0f;
	// Navigation Invoker 컴포넌트 생성 및 초기값 셋업.
	NavInvoker = CreateDefaultSubobject<UNavigationInvokerComponent>(TEXT("NavInvoker"));
	// SetGenerationRadii 함수를 사용하여 생성 반경과 제거 반경 설정
	NavInvoker->SetGenerationRadii(NavGenerationRadius, NavRemovalRadius);

	// Note: The skeletal mesh and anim blueprint references on the Mesh component (inherited from Character)
	// are set in the derived blueprint asset named ThirdPersonCharacter (to avoid direct content references in C++)
}

//////////////////////////////////////////////////////////////////////////
// Input

void ASCC_UEAICharacter::NotifyControllerChanged()
{
	Super::NotifyControllerChanged();

	// Add Input Mapping Context
	if (APlayerController* PlayerController = Cast<APlayerController>(Controller))
	{
		if (UEnhancedInputLocalPlayerSubsystem* Subsystem = ULocalPlayer::GetSubsystem<UEnhancedInputLocalPlayerSubsystem>(PlayerController->GetLocalPlayer()))
		{
			Subsystem->AddMappingContext(DefaultMappingContext, 0);
		}
	}
}

void ASCC_UEAICharacter::SetupPlayerInputComponent(UInputComponent* PlayerInputComponent)
{
	// Set up action bindings
	if (UEnhancedInputComponent* EnhancedInputComponent = Cast<UEnhancedInputComponent>(PlayerInputComponent)) {

		// Jumping
		EnhancedInputComponent->BindAction(JumpAction, ETriggerEvent::Started, this, &ACharacter::Jump);
		EnhancedInputComponent->BindAction(JumpAction, ETriggerEvent::Completed, this, &ACharacter::StopJumping);

		// Moving
		EnhancedInputComponent->BindAction(MoveAction, ETriggerEvent::Triggered, this, &ASCC_UEAICharacter::Move);

		// Looking
		EnhancedInputComponent->BindAction(LookAction, ETriggerEvent::Triggered, this, &ASCC_UEAICharacter::Look);
	}
	else
	{
		UE_LOG(LogTemplateCharacter, Error, TEXT("'%s' Failed to find an Enhanced Input component! This template is built to use the Enhanced Input system. If you intend to use the legacy system, then you will need to update this C++ file."), *GetNameSafe(this));
	}
}

void ASCC_UEAICharacter::Move(const FInputActionValue& Value)
{
	// input is a Vector2D
	FVector2D MovementVector = Value.Get<FVector2D>();

	if (Controller != nullptr)
	{
		// find out which way is forward
		const FRotator Rotation = Controller->GetControlRotation();
		const FRotator YawRotation(0, Rotation.Yaw, 0);

		// get forward vector
		const FVector ForwardDirection = FRotationMatrix(YawRotation).GetUnitAxis(EAxis::X);

		// get right vector
		const FVector RightDirection = FRotationMatrix(YawRotation).GetUnitAxis(EAxis::Y);

		// add movement
		AddMovementInput(ForwardDirection, MovementVector.Y);
		AddMovementInput(RightDirection, MovementVector.X);
	}
}

void ASCC_UEAICharacter::Look(const FInputActionValue& Value)
{
	// input is a Vector2D
	FVector2D LookAxisVector = Value.Get<FVector2D>();

	if (Controller != nullptr)
	{
		// add yaw and pitch input to controller
		AddControllerYawInput(LookAxisVector.X);
		AddControllerPitchInput(LookAxisVector.Y);
	}
}
활성화될 범위 설정과 테스트를 위해 작은값을 부여했습니다.
이때 주의할점은 빌드파일에 “NavigationSystem” 모듈을 작성해줘야 합니다.
확장명이 프로젝트명.Build.cs로 되어있는 파일이 빌드파일입니다.
모듈을 작성해주는 방법은 다음과 같습니다..
using UnrealBuildTool;

public class SCC_UEAI : ModuleRules
{
	public SCC_UEAI(ReadOnlyTargetRules Target) : base(Target)
	{
		PCHUsage = PCHUsageMode.UseExplicitOrSharedPCHs;

		PublicDependencyModuleNames.AddRange(new string[] {
			"Core",
			"CoreUObject",
			"Engine",
			"InputCore",
			"EnhancedInput",
			"NavigationSystem" // 여기 NavigationSystem 모듈 추가!
		});

		PrivateDependencyModuleNames.AddRange(new string[] { });

		// Uncomment if you are using Slate UI
		// PrivateDependencyModuleNames.AddRange(new string[] { "Slate", "SlateCore" });

		// Uncomment if you are using online features
		// PrivateDependencyModuleNames.Add("OnlineSubsystem");

		// To include OnlineSubsystemSteam, add it to the plugins section in your uproject file with the Enabled attribute set to true
	}
}
이제 아까 했던 runtime generation 설정을 Dynamic으로 바꿔주고
이와 동일하게 Project Settings → Navigation System → Generate Navigation Only Around Navigation Invokers → True로 수정해줍니다. 이렇게 되면 우리가 원하는 해당액터 주변에서만 ai 연산을 하기위한 준비는 끝이 났습니다.(NavMesh 동적생성)
이제 코드를 기반으로 한 캐릭터 클래스에 들어가시면 Nav Invoker라는 컴포넌트가 생긴 것을 확인 하실수있습니다.
이를 레벨 내 NavMeshBoundsVolume를 크게 배치 해준 뒤에 액터를 다양한 부분에 배치해 보시면 그 주변만 네비메시가 활성화 됨을 확인할 수 있습니다.
